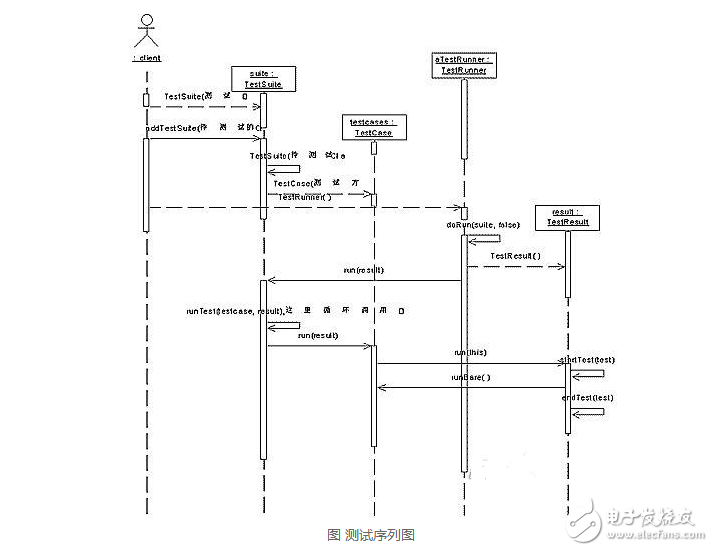
If you are just getting started with the Java world, the first thing to do is to install the JDK, the Java Development Kit, which comes with the Java RunTIme Environment (JRE) and the JVM (Java Runtime Environment). . It allows you to compile, run, and test your Java programs on your own computer. In addition, you also need an IDE (Integrated Development Environment). There are many choices, such as IntelliJ, Eclipse, and NetBeans. 1, related concepts Ø JUnit: is a Java testing framework for developing source code for writing and running repeatable tests. It is an instance of the unit testing framework xUnit (for the java language). Mainly used for white box testing, regression testing. Ø White box test: Think of the test object as an open box, the logic structure inside the program and other information to the tester The staff is open. Ø Regression testing: Software or environment repair or correction after retesting, automatic testing tools are especially useful for such testing. Ø Unit testing: The smallest granularity of testing to test a function or block of code. It is usually done by the programmer because it needs to know the details of the internal programming and coding. 2, unit test 2.1, the benefits of unit testing Ø Improve development speed, the test is executed in an automated manner, which improves the execution efficiency of the test code. Ø Improve the quality of software code, it is released to the integration using a small version, which is convenient for personnel debugging. At the same time introduce the concept of refactoring to make the code cleaner and more flexible. Ø Improve the reliability of the system, it is a kind of regression test. Support for "retesting" after repair or correction to ensure the correctness of the code. 2.2, the object of the unit test Ø Process-oriented software development for the process. Ø Object-oriented software development is targeted at objects. Ø Can do class tests, functional tests, interface tests (most commonly used in test classes). 2.3, unit testing tools and frameworks The current most popular unit testing tool is the xUnit series framework, which is commonly divided into JUnit (java), CppUnit (C++), DUnit (Delphi), NUnit (.net), PhpUnit (PHP), etc. depending on the language. The first and most outstanding application of the unit testing framework is the open source JUnit provided by Erich Gamma (author of Design Patterns) and Kent Beck (founder of XP (Extreme Programming)). 3, introduction to JUnit 3.1, JUnit benefits and JUnit test writing principles The benefits of using JUnit: Ø Separate the test code from the product code. Ø Test code for one class can be applied to tests of another class with fewer changes. Ø Easy to integrate into the tester's build process, JUnit and Ant can be combined to implement incremental development. Ø JUnit is open source and can be redeveloped. Ø It is easy to extend JUnit. JUnit test writing principles: Ø Simplify the writing of tests, including the learning of the test framework and the writing of the actual test unit. Ø Keep the test unit persistent. Ø You can use existing tests to write relevant tests. 3.2, the characteristics of JUnit Ø Use the assertion method to determine the difference between the expected value and the actual value, and return the Boolean value. Ø Test drive devices use common initialization variables or instances. Ø Test package structure is easy to organize and integrate operation. Ø Support graphic interaction mode and text interaction mode. 3.3 JUnit framework composition Ø The method and process set for testing the test target can be called Test Case (TestCase). Ø A collection of test cases that can accommodate multiple test cases (TestCase), called the test suite (TestSuite). Ø Description and record of test results. (TestResult). Ø Event listener (TestListener) during the test. Ø A description of the expected inconsistency of each test method, said its test failure element (TestFailure) Ø Error exception in the JUnit Framework (AsserTIonFailedError). The JUnit framework is a typical Composite pattern: TestSuite can hold any object derived from Test; when the test() method of the TestSuite object is called, it will traverse the objects it holds and call their run() methods one by one. 3.5 Commonly used interfaces and classes in JUnit Ø Test interface: run test and collect test results The Test interface uses the Composite design pattern, which is a common interface for Test Cases, TestSuite, and TestDecorator. Its public int countTestCases() method is used to count how many TestCases are tested. The other method is public void run( TestResult ), TestResult is the instance to accept the test results, and the run method is to perform this test. Ø TestCase abstract class: define the fixed method in the test TestCase is an abstract implementation of the Test interface (cannot be instantiated and can only be inherited). Its constructor TestCase(string name) creates a test instance based on the input test name name. Since each TestCase has a name when it is created, if the test fails, it can identify which test failed. The setUp() and tearDown() methods included in the TestCase class. The setUp() method centralizes all the variables and instances needed for the test, and executes the setUp() method again before calling each test method in the test class. The tearDown() method releases the variables and instances referenced in the test program method after each test method. When developers write test cases, they only need to inherit TestCase to complete the run method. Then JUnit gets the test case, executes its run method, and records the test result in TestResult. Ø Assert static class: a collection of assertion methods Assert contains a set of static test methods for comparing the expected value with the actual value, that is, the test fails, the Assert class will throw an AsserTIonFailedError exception, the JUnit test framework will classify this error into Failes and record it. The flag is a failed test. If a parameter of type String is specified in the method, the parameter will be used as the identification information of the AsserTIonFailedError exception, telling the tester to change the details of the exception. JUnit provides six categories of 31 sets of assertion methods, including basic assertions, numeric assertions, character assertions, Boolean assertions, and object assertions. The internal logic of assertEquals(Object expcted, Object actual) uses the equals() method, which indicates that when the internal hash values ​​of the two instances are equal, it is better to use this method to compare the values ​​of the corresponding class instances. The internal logic of assertSame(Object expected, Object actual) uses the Java operator "==", which indicates that the assertion determines whether two instances are from the same reference. It is best to use this method for different classes. The values ​​are compared. asserEquals(String message, String expected, String actual) This method performs a logical comparison of two strings. If it does not match, it shows the difference between the two strings. The ComparisonFailure class provides an alignment of two strings, and a mismatch gives detailed difference characters. Ø TestSuite test package class? ? Combination of multiple tests The TestSuite class is responsible for assembling multiple Test Cases. The class to be tested may include multiple tests for the tested class, and TestSuit is responsible for collecting these tests so that we can complete all the tests for the tested class in one test. The TestSuite class implements the Test interface and can contain other TestSuites. It can handle all thrown exceptions when joining Test. TestSuite handles test cases with 6 protocols (otherwise it will be rejected) 2 test cases must be public (Public) 2 use cases must be inherited with the TestCase class 2 Test cases must be public (Public) 2 test case test method must be declared as Void 2 The test term of the test case must be test 2 test method error in the test case any pass parameters Ø TestResult result class and other classes and interfaces The TestResult result class aggregates the results of any test accumulation, passing the Run() method of each test through the TestResult instance. TestResult is executed when TestCase is thrown if it fails. The TestListener interface is an event listener specification that can be used by the TestRunner class. It informs the listener of object-related events, including starting test (start test), testing end test (test test), error, adding exception addError (Test test, Throwable t) and adding failure addFailure (Test test, AssertionFailedError t). The TestFailure failure class is a collection of "failed" conditions that explain the anomalies that occur during each test execution. Its toString() method returns a brief description of the "failed" status 4, the use of JUnit in Eclipse Testing is very important for ensuring the quality of software development. Unit testing is even more essential. JUnit is a very powerful unit testing package that can test single/multiple methods of one or more classes, and can also be different. TestCase is combined into TestSuit to automate test tasks. Eclipse also integrates with JUnit, making it easy to write TestCase. Eclipse comes with a JUnit plugin that you can start testing related classes in your project without having to install it, and you can debug your test cases and tested classes. 4.1, JUint use steps in Eclipse The following step environment is Eclipse SDK 3.2.2 and JUnit 3.8.1 Ø Create a new test case or select the existing JAVA file you want to test, click the “File-â€New-â€...†menu item or right-click the file, and select “JUnit Test Case†in the pop-up “New†dialog box. Go to the "New JUnit Test Case" dialog Ø Fill in the corresponding column in the “New JUnit TestCase†dialog box, mainly Name (test case name), SuperClass (if JUnit version is 3.8.1, the tested superclass will default to junit.framework.TestCase; if JUnit The version is JUnit 4.4, the default superclass is java.lang.Object.), Class Under Test, Source Folder (test case saved), Package (test case name), and whether it is automatically generated. Main, setUp, tearDown methods. In this case, fill in NAME and select the setUpt and teardown on the check. Ø Click “Next†button, then enter Test Methods, where you can directly check the method of the tested class you want to test, Eclipse will automatically generate the test method corresponding to the selected method, click the “Fishish†button and then The test case is created. Ø After writing the test case, click the “Run†button to see the results. Added: To use JUnit, you must first save the JUnit JAR on the project's build path and create a test class. The steps to save JUnit on the project's build path are: Right-click on the project - "Select Properties at the bottom of the menu and select Java Build Path - "Select Libraries - "Click Add Variable button -" to see if there is any JUnit file in the existing list. If not, click the Configure Variable - "New" button and enter JUNIT_LIB as the variable name, edit the variable and point to a file named JUnit.jar in the extracted JUnit directory - then select the jar file you just added and click OK. 4.2, JUnit application examples in Eclipse Let's take a test and test method using JUnit for HelloWorld in Eclipse: Ø HelloWorld.sayHello() is executed normally, and the result also meets the requirements. Ø Is the HelloWorld.add() method the same as we expected? Next, we are going to test both methods to make sure they are functional. Select HelloWorld.java, right click and select New-"JUnit Test Case: Go to the following page, where many fields have been filled out, that is, the information about the file to be tested. If you want to delete the test file after the test, you can change the path. (This machine has added a new version of JUnit4.4 based on Eclipse's existing JUnit 3.8.1) Click Next to enter Test Methods, and select the methods you want to test, sayHello and add. Click Finish, and finally write the test case code as follows: Run Run->Run As-"JUnit Test directly, you can see the JUnit test results: Green indicates that the test passed, as long as one test fails, it will display red and list the methods that failed the test. 5, postscript From the above point of view, the use of JUnit is not difficult, but the key is to complete the test code in the final step, that is, write TestCase. It's not easy to write a good TestCase. A bad TestCase is often a waste of time and can't play a practical role. On the contrary, a good TestCase not only can point out the problems in the code, but also can be used as a more accurate documentation of the code, and also plays a very important role in the process of continuous integration. We need to pay attention to the test when writing TestCase: Ø Test independence: Only one object is tested at a time, which is convenient for locating the wrong location. This has two meanings: a TestCase that tests only one object; a TestMethod that tests only one method in the object. Ø Give the test method a suitable name. Usually named after the original method name plus a Test. Ø Give the reason for the failure in the assert function, such as: assertTrue ("... should be true", ...), easy to check. In this example, if the assertTrue cannot be passed, the given message will be displayed. In junit, each assert function has a function argument that displays the message when the error occurs. Ø Test all possible failures, such as frequently changing functions in a class. For those classes that only contain getters/setters, if they are generated by an IDE (such as Eclipse), then it is not possible; if it is manually written, then it is best to test it. Ø The code in setUp and tearDown should not be related to the test method, but should be globally relevant. For and against test methods A and B, the code in setUp and tearDown should be the code required for both A and B. Ø Test code organization: same package, different directories. In this way, the test code can access the protected variables/methods of the tested class to facilitate the writing of the test code. Putting it in a different directory facilitates the management of test code and the packaging and distribution of code. Explain JUnit's test process architecture. We will analyze this graph in detail from a different perspective. Graph test sequence diagram TestNG and JUnit are two of the more common test frameworks for the Java language. JUnit appeared earlier, but the early JUnit 3 had very many restrictions on the test code, which was very inconvenient to use. Later JUnit 4 was greatly improved. TestNG appears to be between JUnit 3 and JUnit 4, but TestNG is better than JUnit 4 in many ways. The following is a comprehensive comparison of TestNG and JUnit 4. The similarities between TestNG and JUnit: 1. Use annotations, and most of the annotations are the same. 2. You can perform unit test. 3. Both are tools for Java testing. Differences between TestNG and JUnit: 1. JUnit can only perform unit tests. TestNG can perform unit test, function test, e2e test, integration test, etc. 2. TestNG needs an additional xml configuration file to configure the test class, method, and even package. 3. TestNG works more flexibly: command line, ant and IDE, JUnit can only use IDE. 4. TestNG's annotations are more abundant, such as @ExpectedExceptions, @DataProvider, etc. 5. The test suite fails to run and JUnit 4 re-runs the entire test suite. When TestNG fails, an XML file is created to indicate the failed test. Using this file to execute the program, the successful test will not be repeated. TestNG is more flexible than JUnit 4: 1. JUnit 4 must declare the @BeforeClass modified method as public static, which limits the variables used in this method to be static. The method of @BeforeClass in TestNG can be exactly the same as the normal function. 2. The dependency of JUnit 4 test is very strong, and there is a strict sequence between test cases. The previous test was unsuccessful and all subsequent dependency tests will fail. TestNG uses the @Test's dependsOnMethods property to address test dependencies. The method that a method depends on fails, it will be skipped instead of being marked as failed. 3. For testing of n different parameter combinations, JUnit 4 will write n test cases. The tasks completed by each test case are basically the same, except that the parameters of the method under test are changed. TestNG's parametric test requires only one test case and then adds the required parameters to the TestNG xml configuration file. The advantage of this is that the parameters are separated from the test code, and non-programmers can also modify the parameters while modifying without having to recompile the test code. 4. To test complex parameterized types that cannot be represented by String or primitive values, TestNG provides @DataProvider to map them to a test method. 5. JUnit 4 test results are reflected by Green/Red bar. TestNG results in addition to Green/Red bar, as well as Console window and test-output folder. The description of test results is more detailed and convenient for positioning errors. Simply put, TestNG is more powerful than JUnit, but if you don't use all the more powerful features, then you still use junit, which is relatively simple, and the Chinese use more. It is better to check Chinese. English is not bad. If you want to know about tests other than unit tests, use TestNG. It mainly introduces Java's exception testing framework. JUnit uses the getting started guide. JUnit is a common tool used in unit testing of Java code. problem: 1, the current test problems 2, JUnit attention to the details 3, JUnit use specification 4. Assertion 5, the case Junit (unit test framework) 1. Current problems 1, the current test method if you need to test, you need to call on the main method 2, the current results require our manual comparison 2. Details of JUnit's attention 1. If you use junit to test a method, displaying green on the junit window means the test is correct. If red is displayed, it means that the test has an abnormality. 2, if you click the method name, class name, package name, project name to run junit test respectively, the method, the class, the test method of all classes in the package, all the test methods in the project 3, @Test test method can not be static decoration and can not be with formal parameters 4. If you need to prepare a test environment or clean up the test environment when testing a method, you can use @Before, @After, @BeforeClass, @AfterClass, four comments, @Before, @After is tested in each test method. It will be called once, @AfterClass, @BeforeClass will be called once before and after all test methods are tested. This method must be static. 3, junit use specification 1, if a class needs to be tested, then the class should correspond to a test class, the naming convention of the test class: the class name of the tested class + Test 2, a method to be tested generally corresponds to a test method, the naming convention of the test method is: test + the method name of the method being tested 4. Assertion The assertion is that the result is not displayed, and the expected value of the program is compared with the actual value to display the running status. 5Assert.assertSame(5, max); // The bottom layer is used == Assert.assertSame(new String("abc"), "abc"); Assert.assertEquals(new String("abc"), "abc"); //The underlying is compared using the Equals method. Assert.assertNull("aa"); Assert.assertTrue(true); 5, the case ? 28package cn.xlucas.junit; Import java.io.*; Import org.junit.*; Public class JunitDemo1 { / / Prepare the test environment @Before @BeforeClass Public static void beforeRead(){ System.out.println ("Prepare the test environment successfully.."); } / / Read the file data, put the file data are @Test Public void readFile() throws IOException{ FileInputStream fileInputStream = newFileInputStream("F:\\a.txt"); Int content = fileInputStream.read(); System.out.println("Content:"+content); } @Test Public void sort(){ System.out.println("Read file data sorting.."); } / / Clean up the test environment @After @AfterClass Public static void afterRead(){ System.out.println("Clean the test environment.."); } } First, JUnit4 is the biggest improvement in the history of JUnit framework. Its main goal is to simplify the writing of test cases by using the Annotation feature of Java5. Second, let's briefly explain what Annotation is. This word is usually translated into metadata. What is metadata? Metadata is data that describes data. In other words, this thing can be used in Java to modify class names, method names, and variable names just like public and static keywords. The role of the modifier describes what the data is for, almost the same as the public description of the data is public. Third, test the methods of the Person class: Test class Person: [java] view plain copy Package com.ren.junit; Public class Person { Private String name; Private int age; Public String getName() { Return name; } Public void setName(String name) { This.name = name; } Public int getAge() { Return age; } Public void setAge(int age) { This.age = age; } } Test the method of this class PersonTest: [java] view plain copy Package com.ren.junit; Import org.junit.After; Import org.junit.AfterClass; Import org.junit.Before; Import org.junit.BeforeClass; Import org.junit.Test; / / Test the Person class Public class PersonTest { Private Person p; @BeforeClass Public static void beforeClass() { System.out.println("boforeClass"); } @Before Public void before() { p = new Person("lisi",20); System.out.println("before"); } @Test Public void testGetName() { System.out.println(p.getName()); } @Test Public void testGetAge() { System.out.println(p.getAge()); } @After Public void after() { System.out.println("after"); } @AfterClass Public static void afterClass() { System.out.println("afterClass"); } } Output result: BoforeClass Before Lisi After Before 20 After afterClass The following is reproduced: Let's take a look at how we write a unit test in JUnit 3. For example, the following class: [java] view plain copy Public class AddOperation { Public int add(int x, int y){ Return x+y; } } We have to test the add method, we write the unit test so: [java] view plain copy Import junit.framework.TestCase; Import static org.junit.Assert.*; Public class AddOperationTest extends TestCase{ Public void setUp() throws Exception { } Public void tearDown() throws Exception { } Public void testAdd() { System.out.println(\"add\"); Int x = 0; Int y = 0; AddOperation instance = new AddOperation(); Int expResult = 0; Int result = instance.add(x, y); assertEquals(expResult, result); } } You can see that the above class uses the static import in JDK5. This is relatively simple. Just add the static keyword after the import keyword, you can import the static variables and methods of the following classes into this class. In the call, there is no difference between calling and calling your own methods. We can see that the unit test above has some more overbearing places, which are manifested in: 1. The unit test class must inherit from TestCase. 2. The method to be tested must start with test. If the unit test above is written in JUnit 4 it will not be so complicated. code show as below: [java] view plain copy Import junit.framework.TestCase; Import org.junit.After; Import org.junit.Before; Import org.junit.Test; Import static org.junit.Assert.*; /** * * @author bean */ Public class AddOperationTest extends TestCase{ Public AddOperationTest() { } @Before Public void setUp() throws Exception { } @After Public void tearDown() throws Exception { } @Test Public void add() { System.out.println(\"add\"); Int x = 0; Int y = 0; AddOperation instance = new AddOperation(); Int expResult = 0; Int result = instance.add(x, y); assertEquals(expResult, result); } } We can see that JUnit using Annotation is not overbearing. You must inherit from TestCase, and the test method does not have to start with test. Just use @Test metadata to describe it. As you can see from the above example, some other metadata is introduced in JUnit 4. The following ones are introduced: @Before: The method that uses this metadata is executed once before each test method is executed. @After: The method that uses this metadata is executed once after each test method is executed. Note: There can only be one for @Before and @After. This is equivalent to replacing the setUp and tearDown methods in previous versions of JUnit. Of course you can continue to call this name, but JUnit will not overbearing you to do so. @Test(expected=*.class) Prior to JUnit 4.0, for error testing, we could only generate an error via fail and test it with assertTrue(true) in the try block. Now, pass the expected property in the @Test metadata. The value of the expected property is an exception type @Test(timeout=xxx): The metadata is passed in a time (milliseconds) to the test method. If the test method does not run within the set time, the test also fails. @ignore: The test method for this metadata tag is ignored in the test. When the test method has not been implemented, or the test method is outdated, or under certain conditions to test the method (such as the need for a database connection, and the local test, the database is not connected), then use the tag to Mark this method. At the same time, you can pass a String argument to the tag to indicate why the test method is ignored. For example: @lgnore ("This method has not been implemented"), when executed, it will only report that the method is not implemented, and will not run the test method. 12V Solar Charge Controller,60 Amp Power Solar Charging Controller,60A Solar Controller,Solar Charge Controller GuangZhou HanFong New Energy Technology Co. , Ltd. , https://www.gzinverter.com